

So it's another week, and as you can tell I'm going to be taking the time to show you guys another one of my simple methods of drawing. The feature I am going to be doing this week is The Nose. Now in my opinion, the nose can be tricky as it is one of the most versatile features on the human face. I wont go into a full anatomy lesson on the nose and all it's parts. That is something that you all can do in your personal studies through observation, and studies of photos.
But in this, simply observe the drawn diagrams that I have put together, and use them as guides in this tutorial. With that said, lets get to drawing some noses, shall we!?

The Front View: In my opinion, the hardest view to draw. I say this because depending on the character, and other factors, if it doesn't look right, it will completely throw off the entire drawing. Features are very important.
The bulb of the nose is first, which is a simple circle. Second, draw two smaller circles on both sides of the main circle, and add sad face at the bottom to represent the nostrils of the nose. The bridge of the nose then is added in the third step as two lines going up the face going toward the eyes.
A simple way to look at this, would be drawing 3 small circles, and a triangle. These are the very basic shapes of the nose. If you follow this formula, then you will see how much this simplifies drawing this difficult feature.
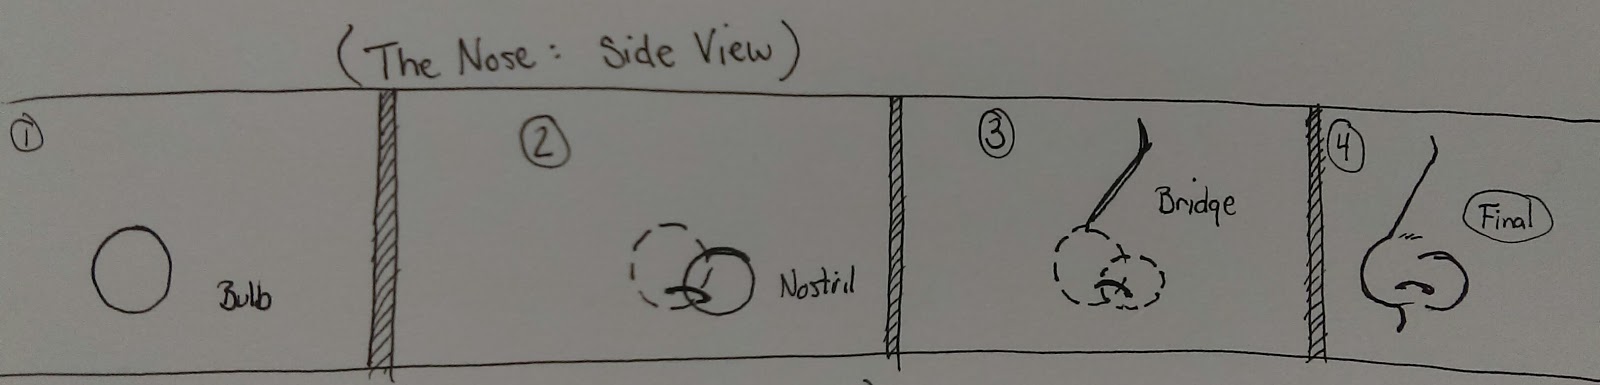
The Side View: Next lets look at the side view. This in my opinion is the easiest view of the nose to draw. In this instance, there are only two circles, and one triangle. it starts again with the bulb of the nose, and one smaller circle on either side of the main circle depending on the direction the face is being drawn.
The only difference with this view is the placement of the nostril, which is a sad face between both circles. A line is then drawn from the top of the bulb of the nose back toward the back of the nostril. It's a good idea to add a few lines over the top of the bulb to identify the top bulb of the nose to indicate mass and shape to the nose.

The Downward View: Again, the easiest angle to draw, the formula for this is simply three small circles and a triangle. When drawing the nose from a birds eye view, think of almost a Mickey Mouse silhouette. The sides of the nose are indicated by two lines going up from the middle of both small circles. And that is it!
And that's all! You have successfully drawn a nose from three different angles! Now a tip to consider and do, is to remember that you can apply this simplistic principle to noses of all shapes and sizes. At times, depending on the shape, the circles may take on more sharper or more bulbous appearance. people come in all different nationalities, so I suggest studying different noses and practice drawing them using this technique.
An exercise I would like you to do, is take magazines, and draw the circles and triangles on each of the drawings, This will describe and prove the validity of this technique. You will be able to observe the different sizes and shapes of the nose, and break them down easily. Learn the fundamentals by studying the anatomy of the nose, and the function. When you have a full understanding, you will be more confident in the rendering of the nose and understand why it is such an important feature, and recognize why the nose can make or break a drawing.
I hope you all are able to use this tutorial in further training and teaching yourself to draw. If you have any questions, or comments, I would love to see them! Until next time everyone, enjoy and get to drawing!!!
Ian Walker
No comments:
Post a Comment